PHOTOGRAPHY

  • Home
  • About Us
  • Blogs
  • Service
  • Contact Us
Explore More

Photographer

Welcome

Capture the best moment of your
life

L

photography1245@example.com

450 NW Couch Street, Oregon 97209

+(00) 13 456 789

  • Facebook
  • Instagram
  • X
  • YouTube
  • Telegram
Latest Post

  • A Complete Guide to Photographing Glass: Techniques, Lighting, and a Special Focus on Marbles

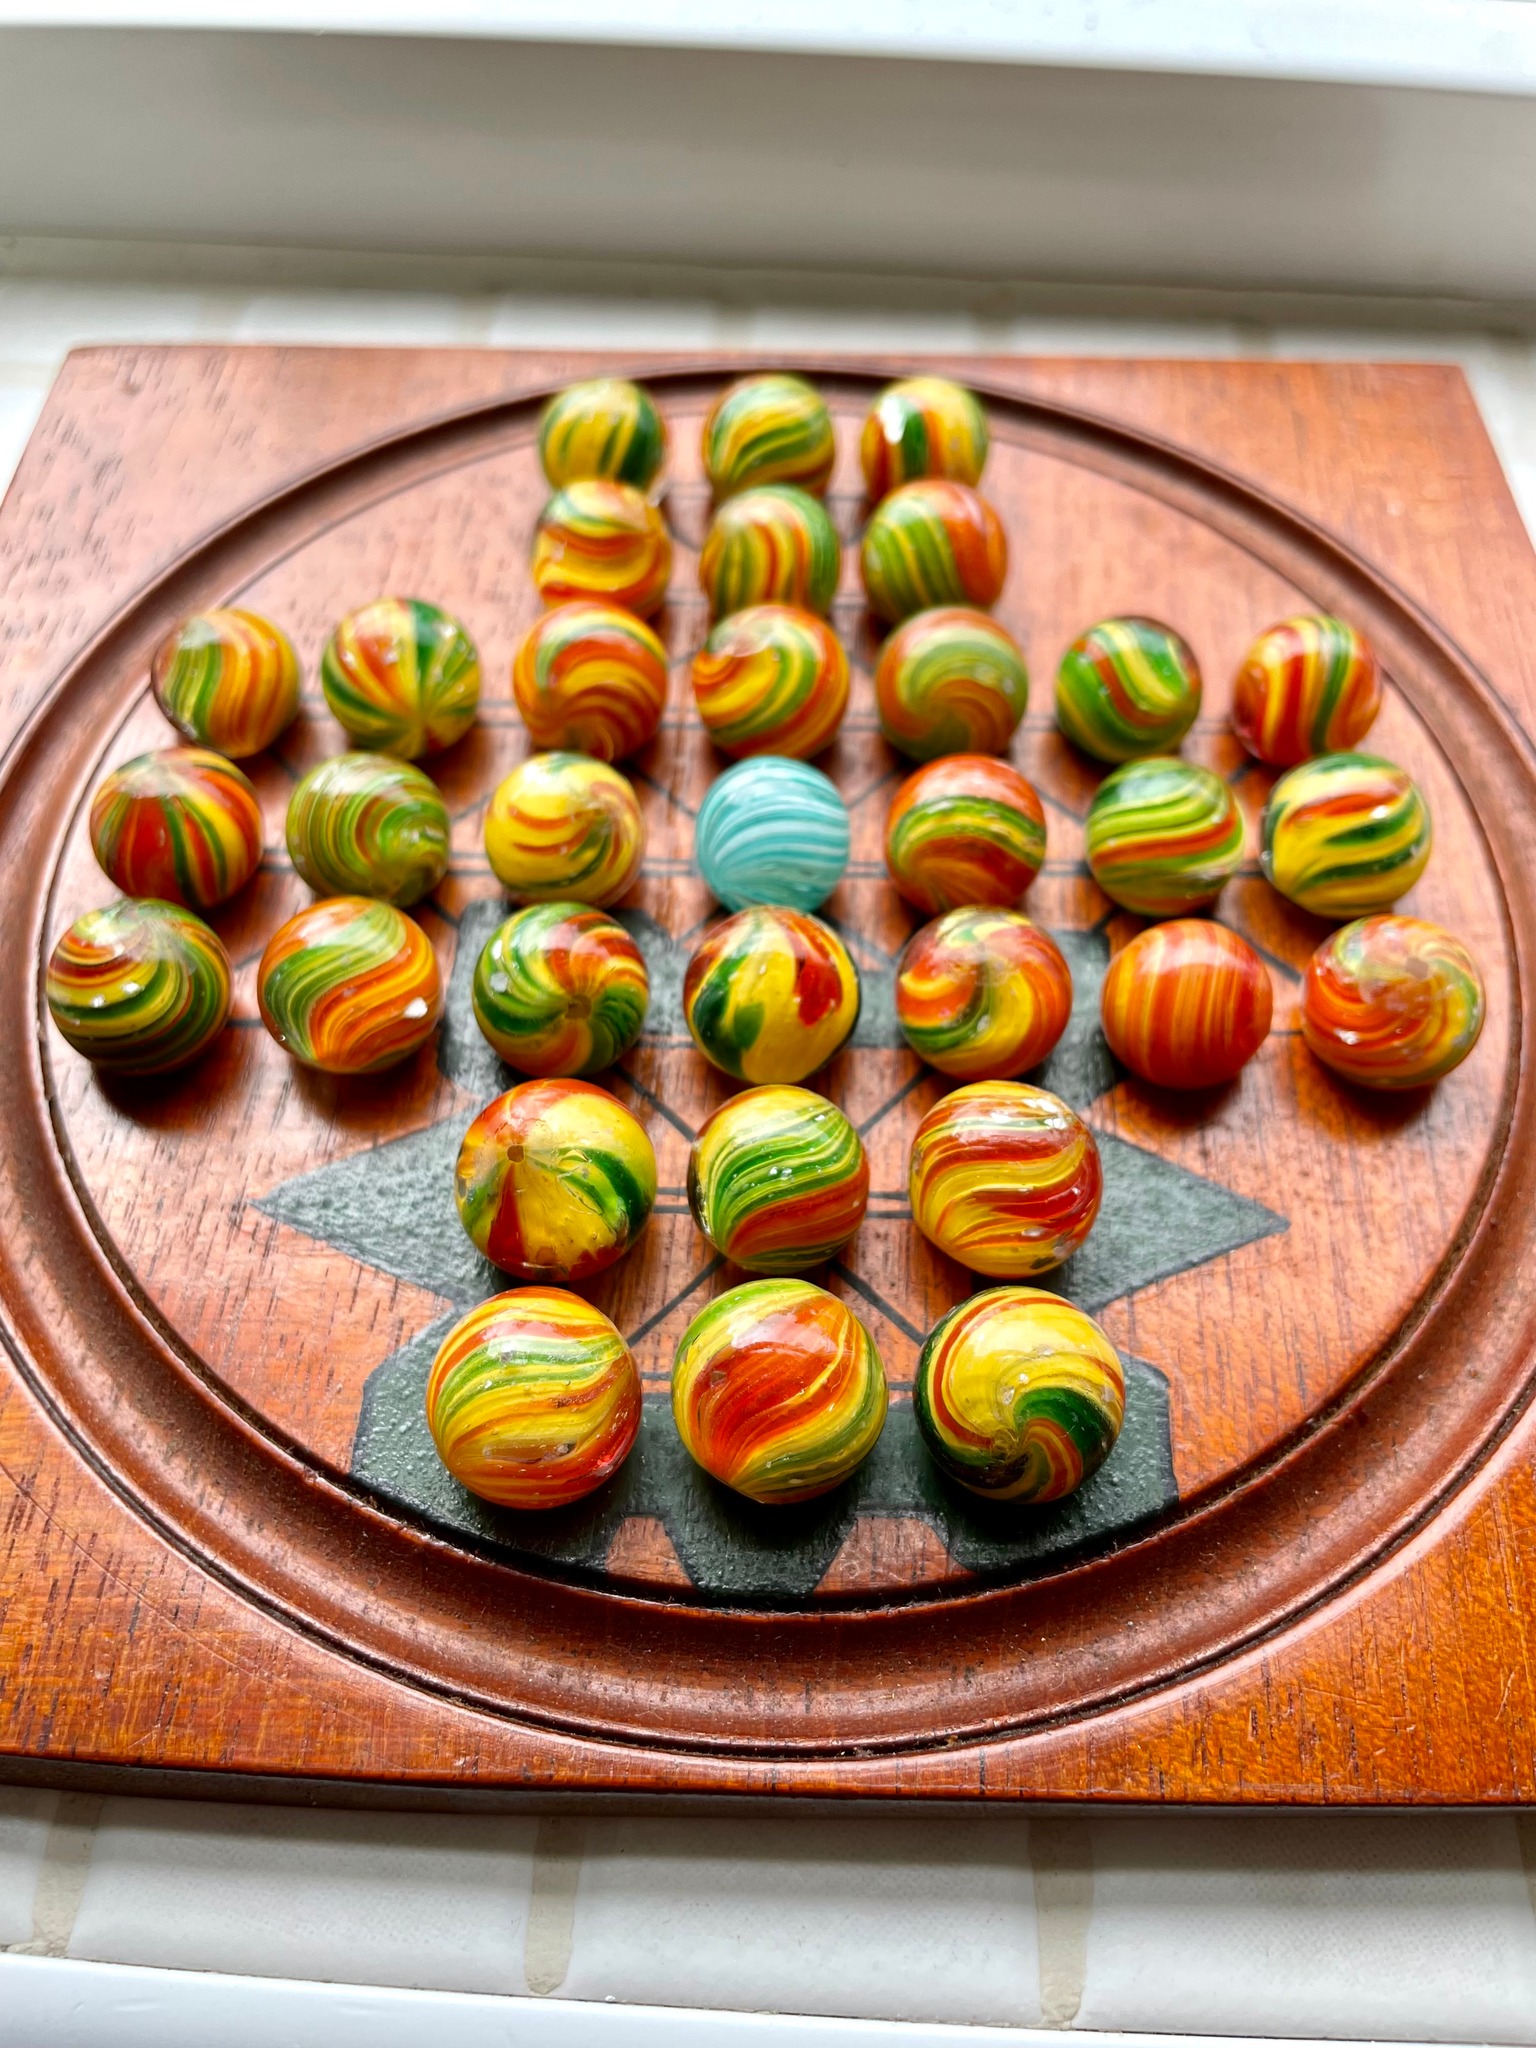
    Marbles are often associated with childhood games or specialist collections, but they also have a long and increasingly relevant history as decorative objects. Made from glass, stone, clay, or agate, marbles combine color, form, and craftsmanship in a way few small objects can. Their tactile nature, light-reflecting qualities, and endless variety make them surprisingly versatile design elements.

    In recent years, interior designers, stylists, and homeowners have rediscovered marbles as subtle yet striking decorative accents. Whether displayed in bowls, used in creative DIY projects, or incorporated into high-end interior styling, marbles offer a timeless aesthetic that works across traditional, contemporary, and eclectic spaces.


    The Visual Appeal of Marbles

    Color, Depth, and Light

    One of the primary reasons marbles work so well as decorative items is their visual complexity. Even a single marble can contain multiple colors, layered swirls, or translucent glass that interacts beautifully with light. When grouped together, marbles create depth and movement that few decorative fillers can replicate.

    Clear and translucent marbles refract light, making them ideal for sunny spaces, window displays, or glass containers. Opaque marbles, particularly those with bold colors or patterns, add contrast and structure to neutral interiors.


    Texture and Form

    Perfectly spherical yet subtly imperfect, marbles offer a pleasing balance between precision and organic variation. Their smooth surface contrasts well with natural materials such as wood, linen, stone, and ceramics. This contrast makes marbles especially effective in minimalist or modern interiors, where small details carry significant visual weight.


    Photographing glass is one of the most challenging yet rewarding areas of photography glass marbles are on another level. Glass is transparent, reflective, and highly sensitive to light, meaning small changes in setup can dramatically affect the final image. Unlike opaque subjects, glass interacts with its environment, reflecting surrounding colors, shapes, and light sources—often in ways the photographer did not intend.

    Whether you are photographing decorative glass, antiques, studio art glass, or collectible marbles, understanding how light behaves is far more important than owning expensive equipment. This guide provides a practical, step-by-step approach to photographing glass successfully, with a dedicated section on marbles and other small spherical glass objects.


    Understanding the Challenges of Glass Photography

    Transparency and Reflections

    Glass does not photograph itself—it photographs what surrounds it. Reflections from windows, walls, clothing, and even the camera can appear clearly in the surface. Transparency adds complexity, as light passes through the object and reveals internal features, dust, or imperfections.

    Successful glass photography is therefore about controlling the environment rather than simply pointing a camera at the subject.


    Light Transmission vs Reflection

    Glass shows its shape not through direct lighting, but through the way light reflects along its edges. Flat lighting often makes glass disappear, while carefully placed highlights define form and depth.

    Understanding this principle is essential before moving on to practical setups.


    Essential Equipment for Photographing Glass

    Camera and Lens

    You do not need the most expensive camera to photograph glass well, but you do need control.

    Recommended features:

    • Manual exposure control
    • Ability to shoot RAW
    • A macro or close-focusing lens

    A macro lens is particularly useful for marbles, allowing you to capture internal detail and surface condition without distortion.


    Tripod

    A tripod is essential. Glass photography often requires longer exposures due to diffused lighting and smaller apertures. A stable camera also allows precise composition and consistent framing.


    Lighting Tools

    Key tools include:

    • Continuous LED lights or desk lamps
    • Diffusers (softboxes, tracing paper, white fabric)
    • Black and white cards (flags and reflectors)

    These inexpensive tools matter more than the light source itself.


    Lighting Techniques for Glass

    Diffused Light Is Critical

    Harsh, direct light creates blown highlights and distracting reflections. Diffused light softens transitions and reveals form more naturally.

    Place lights behind diffusion material to create large, soft light sources. The larger the apparent light source, the smoother the reflections.


    Using Black and White Cards

    Glass often looks best when surrounded by controlled contrast.

    • White cards brighten edges and add clarity
    • Black cards define shape and prevent glass from blending into the background

    Moving these cards millimeters at a time can dramatically change the result.


    Backlighting and Edge Lighting

    Backlighting is especially effective for transparent and translucent glass. Light placed behind the object highlights contours and internal details.

    Edge lighting—placing light slightly behind and to the side—creates luminous outlines that help the glass stand out from the background.


    Background Selection

    Simple Is Better

    Busy backgrounds ruin glass photography. Neutral backgrounds—black, white, or soft gradients—keep attention on the subject.

    • Black backgrounds emphasize highlights and edges
    • White backgrounds create clean, catalogue-style images

    Textured backgrounds should be avoided unless intentionally styled.


    Distance from Background

    Separating the glass from the background helps prevent harsh shadows and allows smoother light falloff. Even a few inches of distance can make a noticeable difference.


    Camera Settings for Glass Photography

    Aperture

    Use smaller apertures (f/8–f/16) to maintain sharpness across the object. For marbles, depth of field is critical due to their curved surface.


    ISO and Shutter Speed

    Keep ISO as low as possible to preserve clarity. Shutter speed is less important when using a tripod—long exposures are acceptable.


    Focus

    Manual focus is often more reliable, especially for small glass objects. Focus stacking may be useful for extreme close-ups.


    Cleaning and Preparation

    Glass shows everything.

    Before shooting:

    • Wear lint-free gloves
    • Clean with microfiber cloths
    • Use compressed air for dust

    Inspect the object under strong light before photographing. Removing dust afterward in editing is far more difficult.


    Special Section: Photographing Marbles

    Unique Challenges of Marbles

    Marbles are small, spherical, and highly reflective. Their curved surface reflects nearly the entire environment, including the camera and photographer.

    Additionally, marbles often contain internal swirls, ribbons, or bubbles that must be revealed without overpowering surface reflections.


    Supporting the Marble

    Marbles should never roll freely during photography.

    Common supports include:

    • Clear museum putty
    • Small rings of clear plastic
    • Soft wax hidden beneath

    Ensure the support does not cast visible reflections or distortions.


    Lighting Setup for Marbles

    A proven setup includes:

    • A diffused light source above and slightly behind
    • Black cards on either side to define edges
    • A neutral background below

    This setup creates a clear highlight band that follows the marble’s curve, defining its shape without harsh glare.


    Revealing Internal Detail

    To highlight internal patterns:

    • Use backlighting with heavy diffusion
    • Slightly underexpose to protect highlights
    • Adjust card placement to control contrast

    Rotating the marble incrementally between shots allows you to capture its most attractive orientation.


    Size and Scale

    For collectible marbles, accurate representation matters. Avoid wide-angle lenses that distort size. Include reference images when necessary, but keep main shots clean and distraction-free.


    Editing Glass Photographs

    Subtle Adjustments Only

    Editing should enhance, not transform.

    Focus on:

    • Contrast refinement
    • Highlight recovery
    • Dust spot removal

    Avoid excessive clarity or sharpening, which exaggerates flaws.


    Colour Accuracy

    Accurate colour is crucial for collectible glass and marbles. Use consistent white balance and avoid heavy color grading.


    Common Mistakes to Avoid

    • Photographing glass in uncontrolled rooms
    • Wearing bright clothing during shoots
    • Overlighting from the front
    • Ignoring dust and fingerprints
    • Relying solely on editing to fix issues

    Most problems are easier to fix during setup than afterward.


    Building a Repeatable Workflow

    Consistency matters, especially for cataloguing collections or selling items online.

    Develop a repeatable process:

    1. Prepare and clean
    2. Set background and cards
    3. Adjust lighting
    4. Lock camera settings
    5. Fine-tune reflections

    This approach saves time and improves results we have

    Photographing glass is less about technical complexity and more about patience, observation, and control. By learning how light interacts with transparent and reflective surfaces, photographers can create images that reveal beauty, craftsmanship, and detail without distraction.

    Marbles, in particular, reward careful handling and thoughtful lighting. When photographed well, they transform from small glass spheres into striking visual objects that showcase both artistry and history.

    With the techniques outlined in this guide, photographing glass becomes not a source of frustration, but a refined and repeatable skill. The Vintage Marbles company are a great place to see some great marbles photography.

  • Top 5 Tips for Photographing Outdoor Gardens with Decorative Topiary Trees
    Capturing the Beauty of Nature: Tips for Photographing Outdoor Gardens There is something truly magical about outdoor gardens, with their vibrant colors, lush using christmas decor greenery, and intricate designs. From decorative topiary trees to artificial flowers with vases, outdoor gardens offer a plethora of stunning visual elements that are just waiting to be captured through the lens of a camera. Whether you’re a seasoned photographer or just starting out, here are five tips to help you take your garden photography to with christmas decorations the next level. 1. Choose the Right Time of Day One of the most important factors to consider when photographing outdoor gardens is the lighting. The best time to capture the beauty of a garden is during the golden hours, which occur shortly after sunrise and just before sunset. During these times, the light is soft and warm, creating a beautiful glow that enhances the colors of the flowers and foliage. Avoid shooting in harsh midday sun, as this can create harsh shadows and wash out colors. 2. Focus on Composition Composition is key when photographing outdoor gardens. Look for interesting angles, leading lines, and patterns that can help draw the viewer’s eye into the image. Experiment with different perspectives, such as shooting from above or getting down low to capture a unique viewpoint. Pay attention to the rule of thirds and use it to create balanced and visually appealing compositions. 3. Highlight the Details When photographing outdoor gardens, don’t forget to focus on the small details that make each garden unique. Whether it’s a cluster of faux orchids in the UK, a festive garland draped over a fence, or a ready-potted plant sitting on a plant stand, these details can add depth and interest to your photos. Get up close and personal with your subjects, using a macro lens if possible, to capture the intricate textures and patterns of the plants and flowers. 4. Play with Depth of Field One way to create visually striking garden photos is to play with depth of field. By using a wide aperture (such as f/2.8 or f/4), you can create a shallow depth of field that blurs the background and focuses the viewer’s attention on the main subject. Experiment with different apertures to see how they affect the look of your images, and don’t be afraid to get creative with your depth of field to add visual interest to your photos. 5. Experiment with Different Perspectives Finally, don’t be afraid to get creative with your photography and experiment with different perspectives. Try shooting from unusual angles, such as lying on the ground or climbing a tree to get a bird’s eye view of the garden. Use reflections in water features or glass surfaces to add a unique twist to your photos. The more you experiment with different perspectives, the more unique and interesting your garden photos will become. In conclusion, photographing outdoor gardens can be a truly rewarding experience, allowing you to capture the beauty of nature in all its glory. By following these tips and techniques, you can take your garden photography to the next level and create stunning images that truly showcase the beauty of the outdoor world. So grab your camera, head outside, and start capturing the beauty of nature in all its splendor.
  • Affordable Photography Services by Davek Kilbey: Your Best Bet
    When it comes to capturing life’s most precious moments, having a skilled photographer on hand is essential. Whether you’re looking to document a special event or simply want to create lasting memories with a photoshoot, finding affordable photography services can sometimes feel like a daunting task. That’s where Dave Kilbey comes in. With his expertise and passion for photography, Dave Kilbey offers top-notch services that won’t break the bank. Let’s delve into why Dave Kilbey’s photography services are your best bet when it comes to capturing life’s memories. **Why Choose Dave Kilbey for Your Photography Needs** Dave Kilbey is a seasoned photographer with a keen eye for detail and a knack for capturing the essence of every moment. Specializing in event photography, Dave has a talent for documenting special occasions in a way that is both authentic and visually stunning. Whether you’re planning a wedding, a birthday party, a corporate event, or a family gathering, Dave Kilbey can help you preserve those memories for years to come. **Affordable Photography Services** One of the standout features of Dave Kilbey’s photography services is their affordability. While some photographers may charge exorbitant rates for their work, Dave believes that everyone should have access to high-quality photography services without breaking the bank. By offering competitive pricing and customizable packages, Dave Kilbey ensures that his services are accessible to a wide range of clients. **Personalized Approach to Photography** What sets Dave Kilbey apart from other photographers is his personalized approach to photography. Before each photoshoot or event, Dave takes the time to understand his clients’ needs and preferences, ensuring that the final product reflects their unique vision. Whether you prefer a candid, documentary style or a more posed and traditional approach, Dave Kilbey can tailor his photography to suit your individual tastes. **Professionalism and Reliability** When hiring a photographer, professionalism and reliability are key factors to consider. With Dave Kilbey, you can rest assured that your photography needs will be met with the utmost professionalism and reliability. From prompt communication and on-time delivery of photos to a friendly and approachable demeanor, Dave Kilbey goes above and beyond to ensure a smooth and stress-free experience for his clients. **Versatility in Photography** While event photography is Dave Kilbey’s specialty, his skills extend far beyond just one genre. Whether you’re looking for portraits, family photos, engagement shoots, or even commercial photography, Dave Kilbey has the expertise and creativity to bring your vision to life. With a keen understanding of lighting, composition, and framing, Dave can transform any moment into a work of art. **Preserving Memories for a Lifetime** At the heart of Dave Kilbey’s photography services is a deep appreciation for the power of photography to preserve memories for a lifetime. Whether you’re celebrating a milestone, reuniting with loved ones, or simply want to capture the beauty of everyday moments, Dave Kilbey’s photos will serve as a lasting reminder of the joy and love that surrounds you. In conclusion, when it comes to affordable photography services that deliver exceptional results, Dave Kilbey is your best bet. With his talent, professionalism, and personalized approach to photography, Dave Kilbey ensures that every moment is captured with beauty and authenticity. So, whether you’re planning a special event or simply want to create lasting memories, look no further than Dave Kilbey for all your photography needs.
  • Portrait Photography Perfection: Mastering the Craft
    Capturing the perfect portrait requires skill, creativity, and an understanding of the art of photography. In the world of photography, portraits are a popular and important genre. Whether you are a professional photographer or an amateur looking to improve your skills, mastering the craft of portrait photography can elevate your work to new heights. In this article, we will explore the key elements of portrait photography and provide tips on how to achieve perfection in your portraits. Understanding the Basics of Portrait Photography Portrait photography is all about capturing the essence of a person through a photograph. It is about showcasing the personality, emotions, and unique features of the subject. To create stunning portraits, photographers need to have a good understanding of lighting, composition, and posing. Lighting plays a crucial role in portrait photography as it can set the mood, highlight features, and create depth in the image. Natural light is often preferred for portrait photography as it is soft and flattering, but artificial lighting can also be used to create different effects. Composition is another key element of portrait photography. A well-composed portrait can draw the viewer’s eye to the subject and create a sense of balance and harmony in the image. The rule of thirds, leading lines, and framing are some composition techniques that can help create visually appealing portraits. Posing is also important in portrait photography as it can convey the subject’s personality and mood. A good pose can make the subject look more natural and comfortable in front of the camera. Tips for Perfecting Portrait Photography Now that we have covered the basics of portrait photography, let’s dive into some tips for mastering the craft and capturing perfect portraits. Focus on the Eyes: The eyes are often referred to as the windows to the soul, and in portrait photography, they can make or break an image. Make sure the eyes are sharp and in focus, as they can convey emotion and draw the viewer into the portrait. Use a Wide Aperture: A wide aperture (low f-stop number) can create a shallow depth of field, blurring the background and making the subject stand out. This technique can help create a more intimate and impactful portrait. Experiment with Angles: Don’t be afraid to try different angles and perspectives when taking portraits. Shooting from above or below can create unique and interesting compositions that add depth to the image. Capture Candid Moments: While posed portraits have their place, candid moments can often result in more authentic and emotional portraits. Encourage your subjects to relax and be themselves, and be ready to capture those spontaneous moments. Event Photography: Capturing the Moment Event photography is a specialized form of portrait photography that focuses on capturing moments at events such as weddings, parties, and corporate functions. Event photographers need to have a good eye for detail, excellent communication skills, and the ability to work in fast-paced environments. They need to be able to capture the essence of the event and the emotions of the guests while also paying attention to the technical aspects of photography. In event photography, it is important to be prepared and have the right equipment. Make sure you have a versatile lens that can capture a variety of shots, from wide-angle group shots to close-up portraits. Be mindful of the lighting conditions at the event and make adjustments as needed to ensure your photos are well-lit and sharp. Communication is key in event photography, so make sure to interact with guests, clients, and event organizers to understand their needs and expectations. Conclusion Portrait photography is a versatile and rewarding genre that allows photographers to capture the beauty and essence of their subjects. By understanding the basics of portrait photography, mastering key techniques, and following the tips provided in this article, you can elevate your portrait photography skills and create stunning, impactful portraits. Whether you are a professional photographer or an amateur looking to improve your skills, mastering the craft of portrait photography can take your photos to the next level. So grab your camera, find your muse, and start capturing portrait photography perfection today.
  • Unlocking the Secrets of Successful Event Photography
    Capturing the essence of an event through photography is a skill that requires more than just technical expertise. Event photography goes beyond simply taking photos; it involves the ability to tell a story, evoke emotions, and create lasting memories. In this article, we will delve into the secrets of successful event photography and how photographers can elevate their craft to capture unforgettable moments. Understanding the Purpose of Event Photography Event photography is not just about documenting what happened during an event; it is about capturing the emotions, interactions, and energy that make the event memorable. Whether it’s a corporate conference, a wedding, a music festival, or a birthday party, event photography plays a crucial role in preserving the essence of the occasion for years to come. Photographers need to understand the purpose of the event and the desired outcome of the photos to effectively capture the essence of the event. Choosing the Right Gear for Event Photography One of the secrets to successful event photography is having the right gear. While a professional camera is essential, photographers should also consider investing in a variety of lenses, a tripod, external flash, and extra batteries. The choice of gear will depend on the type of event, the lighting conditions, and the desired aesthetic. Being well-prepared with the right equipment will enable photographers to capture high-quality photos that truly showcase the event. Creating a Shot List and Being Prepared Before the event begins, photographers should create a shot list to ensure that they capture all the essential moments. This could include key speakers, special performances, candid interactions, and important details. Having a shot list will help photographers stay organized and focused throughout the event. Additionally, photographers should arrive early to familiarize themselves with the venue, lighting conditions, and potential photo opportunities. Being prepared and proactive will enable photographers to capture the best moments as they unfold. Building Relationships and Engaging with Participants Successful event photography is not just about taking photos; it’s also about building relationships and engaging with participants. By interacting with attendees, photographers can create a comfortable and welcoming environment that allows them to capture authentic and genuine moments. Building rapport with participants will also make it easier to capture candid shots and emotions that truly reflect the spirit of the event. Embracing Creativity and Experimentation While it’s important to capture the key moments of an event, successful event photography also involves embracing creativity and experimentation. Photographers should not be afraid to try new angles, perspectives, and techniques to create unique and captivating photos. Whether it’s playing with light, using different compositions, or incorporating creative props, photographers should push the boundaries of their creativity to capture photos that stand out. Editing and Post-Processing Techniques After the event is over, photographers can enhance their photos through editing and post-processing techniques. This could include adjusting exposure, color correction, cropping, and retouching to ensure that the photos look polished and professional. However, it’s important not to over-edit the photos, as authenticity and natural beauty are key elements of successful event photography. Finding the right balance between enhancing the photos and maintaining their authenticity is crucial. In conclusion, successful event photography requires a combination of technical expertise, creativity, preparation, and engagement with participants. By understanding the purpose of the event, choosing the right gear, creating a shot list, building relationships, embracing creativity, and using post-processing techniques, photographers can unlock the secrets to capturing unforgettable moments. Event photography is a dynamic and rewarding field that allows photographers to tell stories, evoke emotions, and create lasting memories through their photos.
Our Services

Our Photography Services

Wedding Photography

05 May 2025

Read More

Nature Photography

05 May 2025

Read More
Our Blog

Our Latest News & Blog

  • A Complete Guide to Photographing Glass: Techniques, Lighting, and a Special Focus on Marbles
    22 January

    admin

    Comments
    A Complete Guide to Photographing Glass: Techniques, Lighting, and a Special Focus on Marbles
  • 15 January

    admin

    Comments
    Top 5 Tips for Photographing Outdoor Gardens with Decorative Topiary Trees
  • Affordable Photography Services by Davek Kilbey: Your Best Bet
    6 November

    admin

    Comments
    Affordable Photography Services by Davek Kilbey: Your Best Bet
  • Portrait Photography Perfection: Mastering the Craft
    6 November

    admin

    Comments
    Portrait Photography Perfection: Mastering the Craft
  • Unlocking the Secrets of Successful Event Photography
    6 November

    admin

    Comments
    Unlocking the Secrets of Successful Event Photography
  • Elevate Your Photography Game with Davek Kilbeys Help
    6 November

    admin

    Comments
    Elevate Your Photography Game with Davek Kilbeys Help
  • Top Tips for Professional Product Photography Success
    6 November

    admin

    Comments
    Top Tips for Professional Product Photography Success
  • Unleash the Power of Events with Davek Kilbey Photography
    6 November

    admin

    Comments
    Unleash the Power of Events with Davek Kilbey Photography

PHOTOGRAPHY